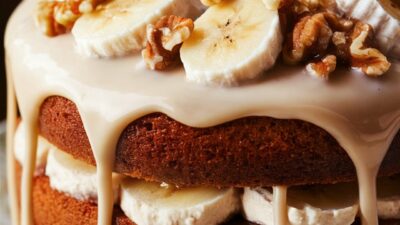
Imagine a dessert that wraps you in warmth, a slice so decadent it evokes soft laughter around the table, the aroma of freshly-brewed coffee blending with buttery cookie crumbs. That’s the magic of a Biscoff Coffee Cheesecake: the spicy-sweet crunch of speculoos (think Lotus Biscoff cookies) meets the smooth richness of a classic cheesecake, all uplifted by a subtle but unmistakable coffee kick.
Whether you’re preparing for a celebratory dinner, a cosy weekend indulgence, or simply treating yourself, this dessert offers more than flavour — it offers experience. With its lush texture, layered flavours and striking presentation, it’s the kind of dessert that makes people pause, savour the moment, and come back for more.
In this article you’ll find everything you need: from selecting the right ingredients to mastering the technique, proper baking and chilling, stunning presentation tips, pairing ideas, dietary adaptations, make-ahead and storage advice, plus troubleshooting and FAQ. Let’s take a delicious journey together.
Why You’ll Love This Biscoff Coffee Cheesecake
1. Unforgettable flavour combination
The union of speculoos-style Biscoff cookies and coffee is inspired. The cookies bring a caramelised, spiced cinnamon-nutmeg note, while the coffee adds depth and a hint of bitterness that balances the sweetness of the cheesecake. Together they create a flavour profile that feels gourmet, yet comforting.
2. Stunning yet approachable
Despite its elegant appearance and layered flavours, this cheesecake is entirely doable for home bakers. With clear steps and a little patience for chilling, you’ll have something that looks (and tastes) like it came from a premium bakery.
3. Perfect for sharing or special occasions
Whether you’re serving it at a dinner party, holiday gathering, or simply enjoying a slice with an evening coffee, this dessert brings the wow factor. And because it can be prepared ahead of time, you avoid last-minute stress and enjoy the moment.
4. Versatile
This cheesecake works with many variations: baked or no-bake, subtle or bold coffee flavour, classic or vegan, minimalist topping or luxurious drizzle. You can tailor it to your tastes and dietary needs while maintaining that signature Biscoff-coffee essence.
Ingredients You’ll Need
Here’s a refined list of ingredients along with notes on how to pick the best versions and why each plays an important role. You can scale the quantities for your pan size (we’ll reference a 9-inch/23 cm springform pan as standard).
For the crust
- Biscoff cookies (speculoos-style biscuits) – These bring sweetness, spice and crunch. Choose fresh-sealed packs for maximum flavour.
- Unsalted butter – Melted, to bind the cookie crumbs into a firm crust. Using unsalted gives you flavour control.
- (Optional) Ground nuts (e.g., pecans or walnuts) – Adds a nutty depth to the crust and extra texture. Useful if you’d like something more than just cookie crumbs.
For the filling
- Cream cheese (full-fat) – The backbone of the cheesecake. Make sure it’s at room temperature for smooth mixing.
- Granulated sugar (or caster sugar) – To sweeten the filling. Adjust to taste if you prefer less sweetness.
- Vanilla extract (pure) – A splash of vanilla rounds out the flavour and complements both the coffee and cookie elements.
- Instant coffee granules (or espresso powder) – Provides the coffee flavour without the need to brew a pot. Choose good quality for best flavour.
- Heavy (whipping) cream – Whipped and incorporated into the filling to give lightness and a creamy texture.
- (For baked version) Eggs – If you decide to bake (see later), eggs add structure.
- (Optional) Cornstarch or flour – Used in baked versions to help set the cheesecake and prevent cracking.
- (Optional) Sour cream or Greek yogurt – Some recipes include this for tang and a smoother texture.
For the topping (optional but recommended)
- Additional crushed Biscoff cookies – For that final crunchy flourish and visual appeal.
- Biscoff cookie-butter spread – Great for drizzling or spreading on top for extra decadence.
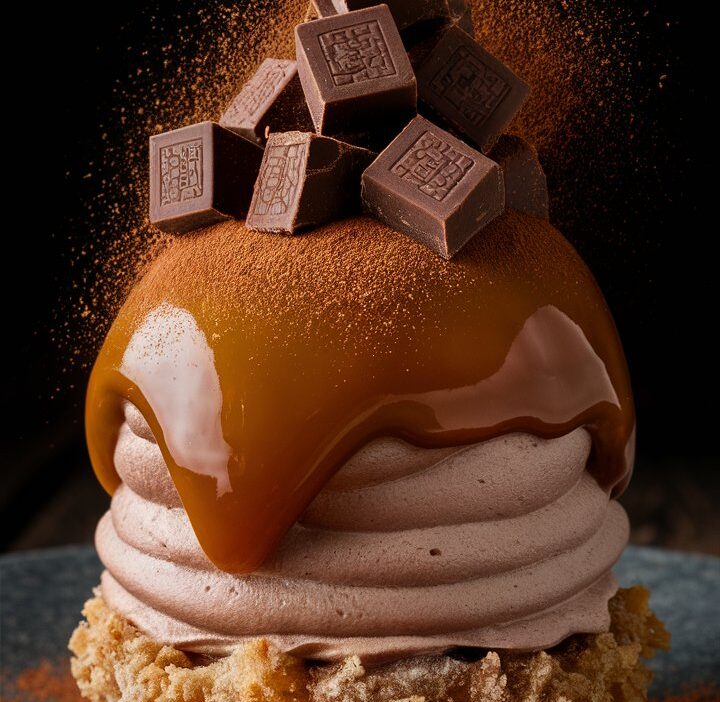
- Caramel drizzle or chocolate ganache – If you want to elevate further, pairing caramel or mocha chocolate with the coffee/ biscuit base is gorgeous.
- Whipped cream or fresh berries – For a lighter contrast, freshness and garnish appeal.
Equipment & Pan Basics
Before you begin, ensure you have the right equipment to make your process smooth and avoid common pitfalls.
- 9-inch (approx. 23 cm) springform pan – The removable sides make it easier to unmould the cheesecake for a beautiful presentation.
- Food processor or rolling pin + zip bag – For crushing cookies into fine, even crumbs.
- Mixer (hand or stand) – To beat cream cheese and whip cream.
- Rubber spatula – For folding the whipped cream into the filling gently.
- Mixing bowls – Ensure you have one large bowl and one smaller one for whipped cream.
- (Optional for baked version) Large roasting pan for water bath – If baking the cheesecake, a water bath helps prevent cracks.
- Offset spatula – Helps to smooth the top of the cheesecake and apply toppings.
- Kitchen scale or measuring cups/spoons – Precise measurements improve results, especially in baking.
- Oven thermometer – If your oven runs hot or cool, an oven thermometer ensures accurate baking temperature.
Step-by-Step Directions
Here you’ll find a detailed walk-through, including both no-bake and baked variations, so you can choose the method that suits your schedule and preferences.
Prepare the crust
- Pre-heat your oven if using the baked method (e.g., 350 °F / 175 °C). If doing no-bake, simply prepare the crust and chill.
- Crush the Biscoff cookies into fine crumbs. You can use a food processor or place them in a zip-lock bag and roll with a rolling pin until they resemble coarse sand.
- In a bowl, combine the crumbs with melted unsalted butter (and optionally ground nuts). Stir until the mixture when pressed holds together.
- Press this mixture firmly into the base (and optionally up the sides) of your springform pan. Use the back of a measuring cup or flat glass to compact it evenly.
- If baking: bake the crust for about 8–10 minutes, then let it cool. If no-bake: place the crust in the freezer or refrigerator for 15–20 minutes to set while you prepare the filling.
Make the filling
- Ensure your cream cheese is at room temperature — this helps avoid lumps and ensures a smooth texture.
- In a large mixing bowl, beat the cream cheese and granulated sugar until smooth and creamy. Add vanilla extract and dissolved instant coffee granules (in a small amount of hot water if needed) and mix until just combined.
- If you’re doing a baked version: add eggs one at a time on low speed, then add cornstarch (or flour) and mix until smooth.
- In a separate bowl, whip the heavy cream until soft peaks form (i.e., when you lift the whisk, the peaks hold but gently fold over). Be cautious not to over-whip.
- Gently fold the whipped cream into the cream cheese mixture using a rubber spatula — the goal is to preserve the lightness and air you’ve created.
- Pour the filling over the prepared crust, smoothing the top with a spatula.
Bake or chill
For baked version:
- Wrap the outside of your springform pan in a double layer of heavy-duty aluminium foil (to prevent water from leaking in). Place the pan into a larger roasting pan, pour in hot water up to about halfway up the springform sides (creating a water bath).
- Bake at 350 °F (175 °C) for about 50–60 minutes, or until the edges are set and the centre is slightly wobbly (it will continue to set as it cools).
- After baking, turn off the oven, prop the door open slightly and let the cheesecake cool gradually in the oven for 1 hour to prevent cracking. Then remove, let it cool to room temperature, then refrigerate for at least 4–6 hours or overnight.
For no-bake version: - After pouring the filling onto the crust, cover with cling film and refrigerate for at least 8 hours, ideally overnight. The setting time helps flavour development and stability.
Topping & finishing touches
- Once the cheesecake has fully chilled and set, remove it from the springform pan (run a warm knife around the edge, wipe clean).
- Drizzle melted Biscoff cookie-butter (gently warmed) across the top, allowing it to drip slightly down the sides if desired.
- Sprinkle crushed Biscoff cookies around the edge or centre. Add a swirl of whipped cream or fresh berries for contrast and visual appeal.
- For extra flair: add a caramel drizzle, chocolate ganache lines, or even a light dusting of cocoa or cinnamon.
Serving
- Use a sharp knife warmed under hot water and wiped clean between slices to get clean cuts.
- Serve each slice cold, perhaps with a small dollop of whipped cream or a coffee on the side.
- For coffee lovers: pair it with a strong espresso or cappuccino — the flavour will mirror and enhance the cheesecake’s coffee-biscoff essence.
Tips & Techniques for Best Results
Here are some professional tips to ensure your cheesecake turns out beautifully every time:
Use room-temperature ingredients
Cold cream cheese and eggs make it much harder to achieve a smooth filling — you risk lumps or over-beating. Pre-soften for at least 1 hour at room temperature.
Don’t over-mix
Especially after adding eggs or whipped cream. Over-mixing introduces too much air, increases risk of cracks, and affects texture.
Whip heavy cream correctly
If the cream is too warm, it won’t whip properly. Chill the bowl and whisk for 5–10 minutes before whipping. Whip until soft peaks (not too stiff) so it folds easily into the filling.
Prevent cracks (for baked version)
- Use a water bath to moderate the heat, reduce thermal shock.
- After baking, turn off the oven and keep the cheesecake inside with door slightly open for gradual cooling.
- Don’t over-bake — when the centre still has a small jiggle, that’s okay. It will set as it cools.
- Run a thin knife around the edge of the pan after baking, before chilling, to allow slight shrinkage without cracking.
Chill thoroughly
Patience is key. Many cheesecakes seem set when warm but collapse if cut too soon. Refrigerate for at least 4 hours, ideally overnight, to improve texture and flavour.
Clean slicing
Dip your knife in hot water between slices, wipe dry, then cut again — helps you get clean edges and avoids dragging crumbs.
Fresh additions
Use fresh cookies for crust and topping. Also, quality instant coffee/espresso powder and pure vanilla extract make a real difference.
Make-Ahead & Storage Advice
Make-Ahead
You can prepare the crust and filling the day before you plan to serve. For a no-bake version, assemble the night before and chill. For baked, bake the day ahead, chill overnight, then top and serve the next day.
Storing
- Store in an airtight container in the refrigerator — best consumed within 4-5 days for optimal texture and flavour.
- If storing for longer: you can freeze individual slices (wrapped tightly in plastic wrap+foil) for up to 2–3 months. Thaw in the fridge overnight before serving.
Reheating / serving later
Never microwave a cheesecake — it will ruin texture. If it’s been in the fridge, take it out ~15–20 minutes before serving to soften just slightly for best mouth-feel.
Variations & Dietary Adaptations
No-Bake Version
Skip the eggs, skip the baking step. Use crushed cookies + melted butter for the crust, and a whipped cream-cream-cheese mixture for the filling. Chill until set. This version is quicker and perfect when you don’t want to use the oven.
Vegan Version
- Use vegan cream cheese alternatives (e.g., cashew-based or soy-based).
- Replace heavy cream with coconut cream (chilled).
- Use vegan butter for the crust.
- Replace eggs (if the recipe uses them) with a stabiliser like agar-agar or silken tofu blend.
- Use a vegan Biscoff-type cookie (ensure no dairy) or speculoos alternative.
Gluten-Free Version
- Use gluten-free speculoos or cookie alternatives for the crust.
- Check all other ingredients (instant coffee powder, cookie butter spread) for certification.
- You can incorporate almond flour or ground nuts into the crust for extra flavour and gluten-free stability.
Flavour Twists
- Mocha: Add melted dark chocolate or cocoa powder to the coffee filling for a mocha flavour.
- Salted caramel: Drizzle salted caramel instead of or in addition to cookiebutter drizzle.
- Berry: Serve with a tart berry compote to cut through the richness.
- Spiced version: Increase the spice profile by adding a pinch of cinnamon, cardamom or nutmeg to the crust or filling.
Presentation & Pairing Ideas
Presentation
- Use the springform pan to move the cheesecake to a decorative platter.
- Drizzle toppings just before serving for that glossy finish.
- Garnish with fresh berries (raspberries, blueberries), chocolate shavings or even a dusting of cocoa or cinnamon for contrast.
- Serve slices on white plates to highlight the rich colours, with a dollop of whipped cream or a small cookie on the side.
Beverage Pairings
- Coffee: A strong espresso or ristretto complements the coffee flavour in the dessert.
- Milk coffee or cappuccino: For a softer match, perfect if you serve brunch.
- Dessert wine or port: If you prefer something sweet, a light port or tawny works with cheesecake.
- Tea: For a lighter pairing, use a spiced chai or an Earl Grey to echo the cookie’s spice notes.
Serving occasion ideas
- Holiday dinners (Christmas, Thanksgiving) — the cookie-coffee flavour suits festive seasons.
- Brunch or afternoon tea — serve in smaller slices with coffee for a luxurious touch.
- Dinner parties — make ahead, chill overnight, slice and serve with flourish.
- Self-care dessert nights — cozy up with a slice and your favourite hot drink.
Frequently Asked Questions (FAQ)
Q: Can I skip the coffee flavour?
Yes, you can omit the instant coffee granules if you prefer a plain cookie-butter cheesecake. But the coffee adds an essential depth and balance to the sweetness.
Q: My cheesecake cracked. Why?
Cracking can happen if: the cheesecake is over-baked, cooled too quickly, or lacked a water bath (for baked version). Use a gradual cooling process, avoid high heat, and consider a water bath.
Q: How long should I chill it before serving?
Minimum 4 hours (baked version) or 8 hours (no-bake). However, chilling overnight (8–12 h) is strongly recommended for best texture and flavour.
Q: Can I freeze the cheesecake?
Yes — freeze slices tightly wrapped for up to 2–3 months. Thaw overnight in the fridge before serving.
Q: How many servings does it yield?
For a 9-inch springform cake, expect ~8–10 standard slices. Smaller servings (12+) work too depending on appetite.
Q: My filling seems runny after chilling. What went wrong?
Possible issues: not enough chilling time, cream not whipped enough, crust not firm, or in baked version, under-baking. Ensure each step followed properly and allow sufficient setting.
Q: Can I bake the crust but not the filling?
Yes — that hybrid works. Bake the crust for stability, then pour in a no-bake filling and chill. It gives the best of both worlds.
Troubleshooting Table
| Problem | Potential cause | Solution |
|---|---|---|
| Runny filling | Insufficient chill time or under-set filling | Chill longer (overnight ideally) |
| Cracks on top | Over-baking, sudden cooling, no water bath | Bake less, cool slowly, use water bath |
| Crust falling apart | Not enough butter, crust not baked (for baked version) or not chilled | Add a little more butter, bake or chill crust prior to filling |
| Cheesecake too sweet | Sugar amount too high | Reduce sugar by 20-30% next time |
| Coffee flavour too mild | Not enough instant coffee/espresso powder | Increase coffee granules slightly |
| Filling too dense | Over-mixing, whipped cream deflated or not folded properly | Fold whipped cream gently; don’t over-beat |
Nutrition & Portioning
While exact values depend on brand/ingredients and toppings you use, here’s a rough guideline for one slice (if 10 slices from full cake):
- Calories: ~300-350 kcal
- Carbohydrates: ~25-35 g
- Fat: ~20-25 g
- Protein: ~4-6 g
Tip: If you want lighter portions, slice into 12–14 smaller pieces and serve with fresh berries or a fruit compote to complement flavour without increasing sugar/fat.
Final Thoughts
A Biscoff Coffee Cheesecake marries comfort and sophistication—think warm spice, buttery crunch, bold coffee, and creamy richness all in one slice. With clear steps, smart technique and a little patience for chilling, you can create a dessert that tastes like a special occasion but can become a “just-because” treat too.
So gather your ingredients, ready your pan, and embark on this delightful baking (or chilling) adventure. Let each bite transport you: the cookie crust crunching beneath a velvety filling infused with coffee whisper, topped with cookie butter drizzle and a sprinkle of crushed biscoff. Make the moment yours.
Enjoy the process, savour the result—and most importantly, share the joy.