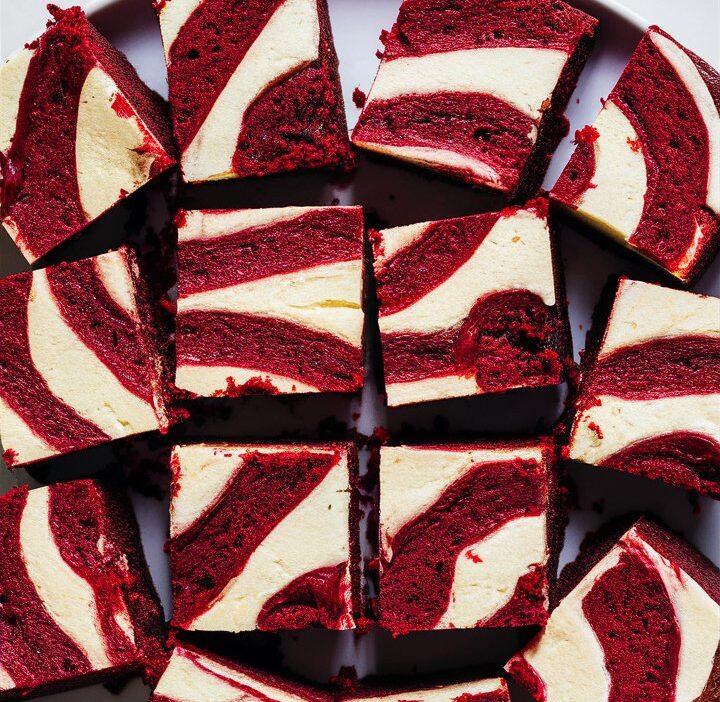
Nothing says love quite like the first bite of a warm, fudgy red velvet brownie. Imagine the moment—rich cocoa aroma filling the kitchen, deep crimson squares cooling on the counter, and that unmistakable swirl of cream cheese frosting glistening on top. These Valentine’s Day Red Velvet Brownies are more than just a dessert; they’re an edible love letter.
This recipe brings together the lush, velvety texture of classic red velvet cake with the dense, chocolate-packed satisfaction of a brownie. Each bite offers a balance of mild cocoa flavor, a touch of tang from buttermilk, and the luxurious sweetness that defines Valentine’s indulgence. Whether you’re baking them for your partner, family, or simply treating yourself, this recipe guarantees a little magic in every square.
So, tie on your apron, preheat that oven, and get ready to craft a batch of brownies that look as good as they taste—because love deserves something this beautiful.
❤️ Why You’ll Love These Red Velvet Brownies
- Romantic & Eye-Catching: That striking red hue turns any dessert table into a Valentine’s Day masterpiece.
- Fudgy, Not Cakey: Perfect texture—soft centers with chewy edges.
- Quick & Simple: Only one bowl and under 45 minutes from start to finish.
- Versatile: Enjoy plain, with cream cheese frosting, or with a drizzle of chocolate ganache.
- Crowd-Pleaser: Ideal for Valentine’s dinner, anniversaries, parties, or just a cozy night in.
🍫 The Story Behind Red Velvet
Red velvet’s roots stretch back to the 19th century when bakers discovered that natural cocoa created a reddish hue when mixed with acidic ingredients like vinegar or buttermilk. Over time, this elegant cake evolved—gaining its signature bright color through modern food coloring.
The transition from cake to brownie happened naturally for chocolate lovers who wanted something denser, richer, and easier to prepare. These red velvet brownies capture that heritage while delivering contemporary appeal—a dessert that’s nostalgic and new all at once.
🧁 Ingredients for Valentine’s Day Red Velvet Brownies
Here’s what you’ll need to make 16 perfect squares of love.
| Ingredient | Purpose / Tip |
|---|---|
| 1 cup all-purpose flour | Forms the brownie’s structure. Sift for an even, light texture. |
| ⅓ cup unsweetened cocoa powder | Adds deep chocolate flavor; Dutch-processed gives darker results. |
| 1 cup granulated sugar | Ensures sweetness and a shiny crust. |
| ½ cup brown sugar | Adds moisture and a hint of caramel depth. |
| ½ cup unsalted butter (melted) | Richness and fudginess. Use quality butter for best flavor. |
| ½ cup buttermilk | The secret to tender, moist texture and tangy flavor. |
| 1 tbsp red gel food coloring | Creates that stunning red hue—gel gives stronger color without extra liquid. |
| 2 large eggs | Provide structure and help bind ingredients. |
| 1 tsp vanilla extract | Balances cocoa bitterness with warm aroma. |
| ¼ tsp salt | Enhances overall flavor. |
Optional toppings: Cream cheese frosting, chocolate drizzle, or powdered sugar dusting.
🧑🍳 Step-by-Step Instructions
Step 1: Preheat the Oven
Set your oven to 350°F (175°C). Line an 8×8-inch baking dish with parchment paper or grease lightly.
Step 2: Mix the Dry Ingredients
In a medium bowl, whisk together flour, cocoa powder, salt, granulated sugar, and brown sugar. This ensures even distribution of cocoa flavor.
Step 3: Prepare the Wet Mixture
In a separate bowl, whisk melted butter with eggs until smooth. Add buttermilk, vanilla, and red food coloring. Stir gently until evenly tinted.
Step 4: Combine Wet and Dry
Gradually fold the wet ingredients into the dry. Mix until just combined—overmixing can create tough brownies. The batter should look thick, smooth, and glossy.
Step 5: Bake
Pour the batter into your prepared pan. Smooth the top with a spatula. Bake for 25–30 minutes, or until a toothpick inserted in the center comes out with a few moist crumbs.
Step 6: Cool and Slice
Allow brownies to cool completely before cutting. This step helps them set for the perfect fudgy texture.
🍰 Optional Cream Cheese Frosting
A velvety frosting takes these brownies from delightful to divine.
You’ll Need:
- 4 oz cream cheese (softened)
- 2 tbsp butter (softened)
- ½ tsp vanilla extract
- 1 cup powdered sugar
Directions:
Beat cream cheese and butter until creamy. Add vanilla and powdered sugar gradually. Spread evenly over cooled brownies. Chill briefly before serving for neat slices.
🍓 Serving Suggestions
| Pairing | Why It Works |
|---|---|
| Vanilla ice cream | Its cool creaminess balances the brownies’ rich cocoa flavor. |
| Fresh strawberries or raspberries | Add freshness and a romantic pop of color. |
| Dark chocolate drizzle | Enhances the brownie’s deep chocolate essence. |
| Cup of coffee or red wine | Perfect companions for an indulgent evening. |
💡 Presentation Tip: Dust the top with powdered sugar hearts using a stencil for an Instagram-worthy Valentine’s dessert board.
🧠 Expert Baking Tips
- Use quality cocoa: It makes a huge difference in flavor depth.
- Measure carefully: Too much flour dries brownies; spoon and level for accuracy.
- Don’t overmix: Gentle folding keeps the texture tender.
- Cool completely: Patience ensures clean, perfect slices.
- Use gel coloring: Keeps batter consistency ideal while producing a vibrant hue.
❌ Common Mistakes to Avoid
- Using sweetened cocoa: Throws off the balance and can make brownies overly sugary.
- Overbaking: Leads to dry, cakey results—check a few minutes before time ends.
- Cutting too early: Warm brownies crumble easily; let them rest first.
- Skipping the salt: A pinch of salt is essential for amplifying cocoa flavor.
- Incorrect pan size: Too large or small pans alter texture and baking time.
🕒 Make Ahead & Storage Tips
Make Ahead:
Prepare the batter up to 48 hours in advance. Store covered in the refrigerator. Let it return to room temperature before baking.
Storage:
- Room Temperature: Up to 3 days in an airtight container.
- Refrigerator: Up to 1 week.
- Freezer: Wrap individual squares in plastic wrap; store up to 3 months.
Reheating:
Warm a piece in the microwave for 10–15 seconds or in a 350°F oven for 5–7 minutes.
💡 Flavor Variations
- White Chocolate Swirl: Drop spoonfuls of melted white chocolate into the batter before baking. Swirl with a toothpick for a marbled look.
- Nut Lover’s Twist: Add chopped pecans, walnuts, or almonds for crunch.
- Espresso Kick: Stir in 1 tsp espresso powder for deeper chocolate flavor.
- Berry Burst: Add freeze-dried raspberries or strawberries for a tart surprise.
- Heart-Shaped Version: Use a heart cookie cutter after cooling—perfect for gifting.
📋 Nutrition (Per Serving)
- Calories: ~180
- Carbohydrates: 23g
- Sugar: 15g
- Fat: 9g
- Saturated Fat: 5g
- Protein: 2g
- Sodium: 120mg
- Fiber: 1g
(Nutrition values are approximate.)
💬 FAQs
1. Can I make these brownies gluten-free?
Yes! Use a 1:1 gluten-free all-purpose flour blend. Choose one containing xanthan gum for best texture.
2. What can I use instead of buttermilk?
Mix ½ cup milk with 1 tsp vinegar or lemon juice. Let sit 5 minutes before using.
3. How do I achieve the perfect red color?
Use a concentrated gel or paste food coloring. Liquid coloring can dull the hue.
4. Can I frost them later?
Absolutely. Store brownies unfrosted, then add cream cheese frosting right before serving.
5. How do I know when they’re done?
The edges should look set and the center slightly glossy. A few moist crumbs on the toothpick means perfect fudginess.
🌹 The Romance of Homemade Desserts
There’s something profoundly intimate about baking for someone. When you stir cocoa into butter, whisk the eggs, and pour glossy red batter into a pan, you’re not just making dessert—you’re creating a memory.
These red velvet brownies transform simple ingredients into an expression of affection. They invite you to slow down, savor, and share. Serve them with a handwritten note, a cup of coffee, or under candlelight, and you’ll discover that love, indeed, can be baked.
❤️ Conclusion
These Decadent Valentine’s Day Red Velvet Brownies embody everything a romantic dessert should be—rich, tender, and irresistibly beautiful. They’re easy to make, visually stunning, and delicious enough to impress anyone lucky enough to share them with you.
Remember: the secret ingredient is always love. Whether you frost them, drizzle them, or enjoy them plain, these brownies are your ticket to a perfectly sweet Valentine’s celebration.
So preheat your oven, grab your mixing bowl, and bake something unforgettable.
📌 Pin This Recipe
Save it to your Valentine’s Dessert Board and share the sweetness!